Huawai P20 and Huawei P20 pro were launched in March as Huawei’s latest flagship smartphones. Huawei P20 inludes the HiSilicon Kirin 970 system-on-chip (SoC), 4 GB of Ram paired with 128 GB of Storage. This phone comes with premium hardware, a carefully crafted software with heavy betting on AI and machine-learning based EMUI 8.0. You can now root your Huawei P2 and unlock the full potential of your bezel-less iPhone X clone with the help of Magisk systemless root tool.

Root Huawei P20
Since this is a new phone and comes with latest Android version, still there is no one click rooting tool available. But you can root your Huawei P20 using below mention method. This method will be harder and lengthy for first time users. I will make this tutorial nice and easy to understand for you.
Step 1: Install ADB and Fastboot
First of all you have to install ADB and Fastboot on your Computer. Installing those tools are easy. Check this guide to install ADB and Fastboot tools on Windows/Mac/Linux
Step 2: Enable developer options, USB debugging and OEM Unlock
By default “Developer Options” are hidden. You can easily enable it by tapping seven times on build number. Check this picture guide to enable Developer Options. From Developer options menu you can enable USB Debugging to debug your device over USB connection from a command line OR graphical interface on a PC. Also, you can enable “OEM Unlocking” from developer options to allow bootloader unlock on the device. In order to enable developer option follow below mention steps:
- Go to your device Settings.
- Select “About phone” » tap seven times on “Build number”.
└ This will enable Developer options under Settings. - Go back to Settings » scroll down to the bottom and you’ll see Developer options menu.
- Enable OEM Unlock: Open “Developer options” menu » find OEM Unlock toggle and enable it.
- Enable USB Debugging: Open “Developer options” » scroll down a bit and you’ll see Debugging menu, enable “USB Debugging” option from there.
Step 3: Unlock Bootloader
In order to gain root access you may need to unlock bootloader of the Huawei P20. Remember unlocking bootloader will void warranty of your Android device. So make sure to take backup of your important files, images, videos, e-books and etc to your computer.
Step 3.1 – Obtain Bootloader unlock Password
1. Create Huawai account. If you already have a unlock the Bootloader you can skip this step. In order to register with Huawei go to Huawei user registration page.
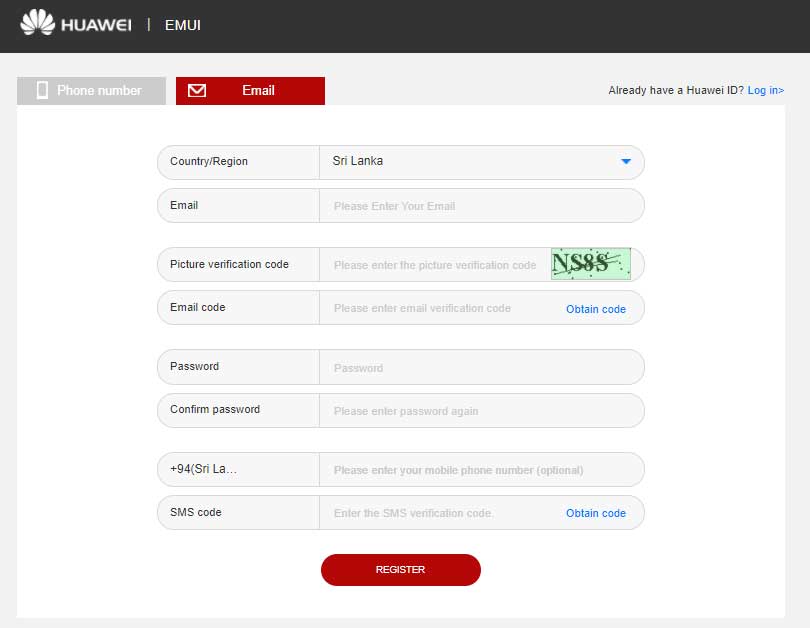
2. Carefully read and accept the unlocking agreement (if you agree) by checking the “I have read and accept all terms above” checkbox and click the Next button.
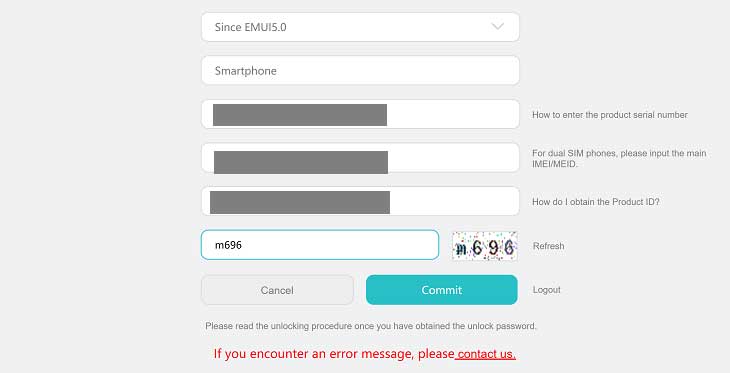
3. You’ll be asked information about your Huawei device, provide the required information and hit Submit button.
4. If you filled in the details correctly, you’ll get the unique 16-digit bootloader unlock password for your device. Note it down somewhere you can remember.
Step 3.2 unlock Bootloader
- Turn off your Huawei P20.
- Press and hold down the Power + Volume Down buttons and release the Power button when the phone vibrates.
- Now your device will boot in recovery mode. Now connect your Huawei P20 to computer using a USB cable.
- Boot into fastboot mode. Type in the following command in the Minimal ADB and Fastboot terminal:
adb reboot bootloader
- Once the device reboots in fastboot/bootloader mode, run in the following command to unlock the bootloader of your Huawei P20:
fastboot oem unlock your-unlock-password
(Enter your 16-digit code in place of your-unlock-password above)
- That’s it. The device is unlocked now.
Step 4: Download Huawei P20 TWRP Recovery IMG file
Click below link to download TWRP Recovery IMG file for the Huawei P20 model number EML. You can check is there any TWRP IMG file released by twrp.me website.
Step 5: Install TWRP IMG file
Make sure you have connect your Android device to computer.
- Open command prompt (Terminal).
- Go to folder where you have the TWRP IMG file.
- In the Command prompt (terminal), run the following command to reboot into fastboot/bootloader mode:
adb reboot bootloader
- Once your device screen appears to be in Bootloader mode, run the command below to install the IMG file:
fastboot flash ramdisk <name of the IMG file>
The command would be this: fastboot flash ramdisk twrp_huawei_P20_0.1.img
- Once the file is flashed to your device, enter the following command to restart your device:
fastboot reboot
- At this point you only have the TWRP recovery at the moment, Which mean rooting process isn’t over yet.
Step 6: Rooting Huawei p20 using SuperSU
- First, download the SuperSU zip file.
- Now, transfer the SuperSU file to Huawei P20
- Open a command/PowerShell window, and run the following command to reboot into fastboot/bootloader mode:
adb reboot recovery
- Once the device boots into recovery mode, you would see TWRP recovery. Skip the system modifications.
- Now, hit the Install button, and then select the SuperSU zip file you transferred in step 2 above.
- Swipe at the bottom to allow installation.
- Tap on Reboot System. That’s it. let the device reboot, and you would have the root access.
Please leave a comment if you encounter any problem.